
Process Tutorial
Guide for index tab layouts
20/10/08 18:28 Filed in:
Index tab cutting
Index tab dividers are a great way to organize material for
projects. They are the most popular and efficient way to arrange,
sort, and categorize information in Three Ring Binders, Plasticoil,
Pasticomb, and Double Loop Wire books. Before getting started on a
tab project there are a few questions to be considered:
What is the depth of the tab? The
depth is the length of the tab extension from the edge of the sheet.
Standard sizes are ½”, 3/8”, and ¼”
What is the size of the inset?
The inset is the distance from the edge of the sheet to the first
tab.
What is the width of the tab? The
width of the tab is figured by taking the inset, (usually ¼” or ½”)
subtracting it from the sheet size, then dividing by the number of
tabs. For example: If your sheet size is 11” and your inset size is
1/4” each side (1/2” total) with 6 tabs, then you subtract ½” from
11 leaving 10 ½” divided by 6 equals 1 ¾” for each tab. This will
help you properly layout your copy.
What is the bank? The
bank of the tabs is the number of tabs on a single row of the face
edge. To figure the size: see above.
Will they be Mylar Reinforced on tabs?
Mylar reinforcing is the process of applying a clear or colored
plastic film to the tabs for strength and durability. There are a
number of colors to choose from so consider these options to add
some flare to your project.
Please note: Mylar cannot be applied after tabs are cut.
Will the tabs be Mylar Reinforced on binding edge?
Edge reinforcing is a clear strip of mylar applied to the binding
edge to help prevent tearing.
Will there be any other finishing required for this project?
A number of things may be done after tabcutting including:
collating, shrinkwrapping, drilling, and inserting into pocket
folders or binders. Just let us know what your needs may be.
One final note:
When a set of tabs will be Mylar Reinforced be wary of printing copy
on the body of the tabs, as the extreme heat used for this process
has been known to cause smudging and streaking of the inks. Even
with heat resistant inks a test run may prevent any unforeseen
problems. If this occurs we may have to Mylar reinforce by hand,
increasing the cost.
Please feel free to download our
GUIDE FOR TAB LAYOUTS
Foil Stamping
16/08/08 09:49 Filed in:
Foil & Embossing Processes
Foil stamping is actually a simple process and consists of mounting
a die to a heated platen in a press. Foil is then passed between the
die and the substrate to be foil stamped. The press then applies a
predetermined amount of pressure to the die,
foil and substrate causing the color layer of the foil to transfer
to the substrate. Most all foil stamping foils consist of 5 layers :
Film carrier
Release coat
Color coat
Metal coat
Adhesive coat
There are a wide range of foil colors and release’s for different
applications so consult with us for color charts, stock
recommendations and image characteristics to produce an award
winning project !!!
Foil Embossing
16/08/08 04:44 Filed in:
Foil & Embossing Processes
Foil embossing uses the same process as foil stamping but the dies
are significantly different and there is a male counterpart to the
die. Foil emboss dies start out as engraved embossing dies, the
outside is relieved creating a cutting edge around the image. When
the die is heated and pressure is applied the foil and the substrate
are pushed into the die with the male counterpart leaving all the
detail and the image completely covered with foil. The same process
can be achieved using a deboss die that pushes the image down as
opposed to raising the image as with embossing. Remember to consult
us on any foil projects. There are a lot of variables with stocks,
inks and coatings to consider. The number one rule to remember when
stamping on inks or coatings is always print with Wax Free
materials!!
Embossing/Debossing
19/07/08 09:19 Filed in:
Foil & Embossing Processes
The art of using either a machined or photo chemically engraved die
to raise or lower an image in a substrate (paper , leather, plastic
etc. ). Embossing or debossing a preexisting image is considered
register where as no exsisting image is considered blind. Embossing
or debossing dies can be made from magnesium, copper, or brass.
Magnesium and copper are photo chemically engraved where as brass is
machined or hand tooled. Embossing or debossing can be simple as a
single level or multiple levels in a variety of profiles. The most
elegant are sculpted brass dies which are generally hand tooled. The
die engraver should be called an artist due to the artistic value
that is required to transfer an image into brass that has all the
detail of a sculptured statue. Embossing/debossing is best when a
heavy textured cover stock is used (80# and up) to enhance the
intricacy and depth of the image and will take more heat and
pressure to give the image a burnished and ironed out effect.
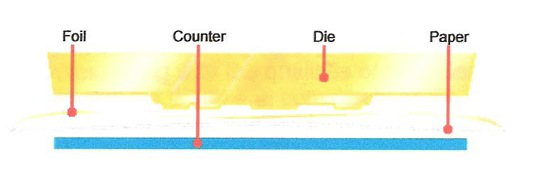
Embossing/ debossing is achieved when the female die is mounted and
heated up in a press, the female counterpart is then transferred to
the platen of the press. The paper is fed between the die and
counter, pressure is applied pushing the paper into the die
transferring all the detail and smoothing out the paper.
Die Cutting
18/07/08 12:52 Filed in: Die Cutting
This process uses a steel rule cutting die. Dies are either Jig or
Laser dies the latter being the most accurate but simple 1 up dies
are generally jig dies and multiple up simple or intricate dies
being laser. Dies consist of .625 birch plywood and a variety of
cutting rules, scoring rules, perfing rules, punches and ejection
rubber that are inserted into the die board after it is machined.
The die is mounted in the press and make ready begins by adjusting
pressure on the press to cause the cutting rules, perfing rules and
punches to cut and scoring rules to crease the paper for folding.
There is a pre manufactured creasing matrix that creates the female
channel that is added to the bottom cutting plate opposite the die,
this channel lets the scoring rule push the paper into it to form
the bead for proper folding. Kiss cutting is used for peel off
labels and for cut scoring. The only difference is the cutting rules
are made ready to only cut through the top layer of stock. The above
processes can be done cold or with heat. Die cutting cold is the
most common and heat being used for plastics, vinyls and troublesome
paper projects where scoring cracks due to coating issues. Please
contact us for all your die cutting needs. We make 95% of all steel
rule dies in house and have several Laser die manufacturers as
vendor partners to round out our team.
Film Laminating
18/07/08 11:53 Filed in:
Film Laminating
This process consists of applying a cold or thermally activated film
to a substrate for cosmetic appearance or protection. There are a
wide variety of film laminates but the most common are OPP
(polypropylene), PET (polyester), AGS ( glueable, stampable) Lay
flat (nylon),Hi Tac digital print films, they come in clear, matte
and satin finishes. There are also a lot of specialty films
available textured, holographic, window cling , floor graphic non
skid to name a few. Please call for any other specialty film
laminates you might need. Films come in thickness ranging from 1.3
mil – 10 mil the most common being 1.3 - 3.0 mil.
The thicker laminates are more for protection and stiffness than
cosmetic value. Most film laminates are applied using heat ,pressure
and are run through a series of heated rollers transferring the film
to the substrate being fed through the machine. There are a lot of
variables to consider when film laminating to insure proper
adhesion, printed sheets need to be wax, silicon free and have at
least a .250 coating free border on all four sides. Please feel free
to call with questions regarding any laminating projects you may
have and get ready to have finished piece with a lot of “Pop” !!!!
Ordering Dies
16/07/08 09:57 Filed in:
Ordering Dies & Artwork - Proofing
There are 3 primary materials we use when making dies in to order
achieve the desired results in all stamping and embossing processes.
They are magnesium, copper, and brass. Many factors are used to
determine which of these materials to use, including: Complexity and
detail of the design, run length, and the necessary lifespan of the
die. We consult with our clients on each job, as each job is
different, to pick the material best suited for achieving your
desired goals.
Magnesium Dies:
These dies are most commonly photo-etched. They are the most cost
effective method for flat stamping and some single level embossing
applications. These dies are best suited for short runs, but are
limited based on image area and type of stock. They work best with
small to medium sized surface areas, but should not be used when
fine detail or uneven distribution is needed. Paper stocks that are
smooth or coated work best when using magnesium dies.
Copper Dies:
These dies are also produced by a photo-etching process, and they
are also used for flat stamping and single level embossing. However
copper is a harder metal and better heat conductor than magnesium.
Therefore it has better etching attributes and has a longer lifespan
for extended or repeated runs. Copper’s durability is also an
important factor when stamping medium to large solid areas, where
more tonnage and pressure are needed. This helps ensure the die will
not crush under the pressure. Copper’s conductive properties allow
it to maintain heat very well. This is most important on high speed
equipment, where the equipment’s speed and action can cool the die
temperature. Finally, if you are using textured and recycled stocks
a copper die is the way to go.
Brass Dies:
Brass is the most versatile and durable of these 3 metals. These
dies are hand crafted or milled on a CNC, and are used when the
utmost quality is required. Brass is the only metal suitable for
multi-level and sculptured embossing. It is also used when a bevel
is required and for most combination processes, including
foil/embossing and foil/debossing. Because they can now be machine
milled, brass dies are extremely precise.
Preparing Artwork
15/07/08 11:06 Filed in:
Ordering Dies & Artwork - Proofing
Steel Rules Dies
We have our own inhouse dieshop, and do most of our diecut dies on
the premises. Dies that require more detail are sent out to a laser
diemaker. In both instances the file requirements are the same. Die
files should be saved as a PC formatted EPS file. There should be no
errant or unnecessary lines. We also require a drawout or sample of
some type with all scores, perfs, and knives clearly marked.
We also utilize Cimex, a CADD program designed specifically for the
Steel Rule Die industry, to further assist you in achieving the best
possible product. Cimex allows us to cut prepress samples that are
extremely accurate. After any changes have been made and we get an
approval, we use the exact same file to generate the image drawn on
the dieboard. This allows us to draw dies that are much more
accurate than anything drawn by hand. Images for samples should also
be saved as a PC formatted EPS file.
Foilstamp and Emboss Dies
Digital files have now become the preferred method for receiving
information to make stamping and single level embossing dies.
Diemakers suggest that files be saved as an original art file
instead of a file in a layout program such as QuarkXPress,
Pagemaker, or InDesign. Most die makers prefer files in PDF format.
The files should be clean and crisp, as any flaws will show on the
die. All images should be 100% of size and solid line art without
the use of screens. The artwork should be saved at 600 dpi or higher
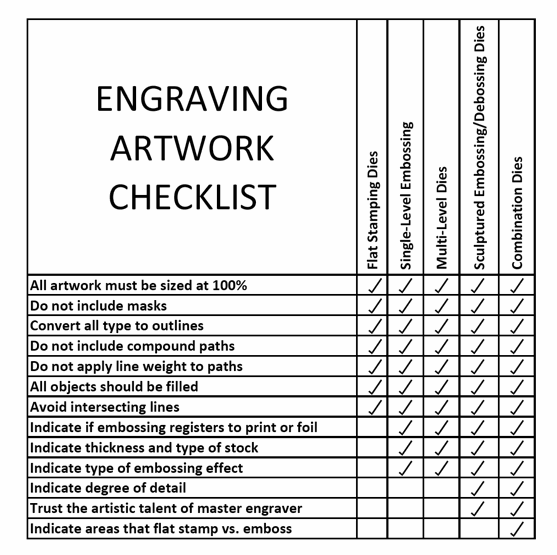
to ensure a crisp image. Some guidelines to go by are:
Do not include masks
Convert all type to outlines
Do not include compound paths
All objects should be filled
Avoid intersecting lines or images
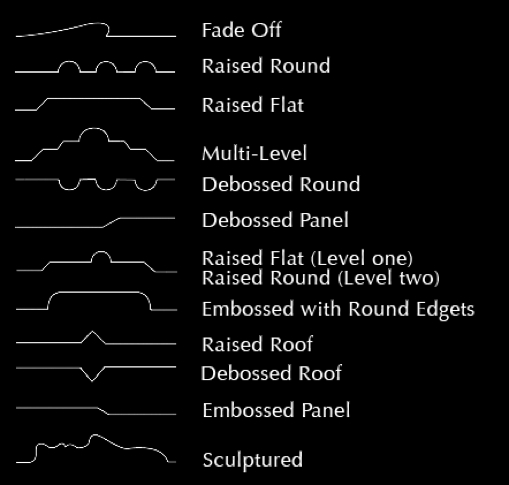
When preparing artwork for brass multi-level and sculptured dies,
any embossing effects must be indicated. The most common effects are
either raised round (round lift), raised flat (beveled flat lift),
or raised roof (raised faceted).
Sculptured embossing dies are hand engraved by master engravers.
Although the designer has a say in how much detail will be necessary
and where it will be placed, they will also have to rely on the
master engraver’s expertise. If only part of an image is to be
sculpture embossed it is best to separate the layer that is to be
embossed from the layer not embossing so as to avoid confusion.
Combination foil/embossed and foil/debossed dies follow the same
guidelines as above for artwork. However, if parts of the image will
be foil/embossed while other parts will only flat stamp, this must
be clearly marked on the artwork.
Proofing
15/07/08 11:00 Filed in:
Ordering Dies & Artwork - Proofing
Proofing is a very simple and helpful tool in stamping. The most
difficult thing is time constraints. If given enough time we can
make a proof or sample with just 3 basic tools: a sample roll of the
foil, the die(s), and a few sample sheets of the stock. This is
always a good idea when time permits to prevent unforeseen problems.
Glossary Of Trade Terms
14/07/08 22:55 Filed in:
Glossary of Trade Terms
Artwork, Camera-Ready
Final drawings or stats in high contrast black and white, used to
reproduce the image with all blemishes and imperfections removed.
Beveled Edge
The edge of an embossed or debossed area made to a specific angle to
the proper plane. These beveled edges range from 30 to 80 degrees
from the paper and image planes.
Blind Emboss/Deboss
Raising or lowering the image without registering to print or foil.
Border
Referred to as a line to be printed, stamped, embossed, or debossed.
It is open inside it’s perimeter, rather than solid.
Chiseled
A shape put into embossed or debossed images resembling a V-shape.
Color Register
Having design elements fit each other through various press
operations, such as printing, embossing, foil stamping, folding, or
diecutting.
Deboss
Lowering the image below the paper level.
Die, Combination
A female die used to emboss and hot stamp simultaneously. It has a
cutting edge to aid in a clean cut of the foil around the image
area.
Die, Counter
A male counterpart molded from the original female dies used to
press the paper into the die to emboss or deboss.
Diecutting
Cutting the paper or substrate with a knife-edge steel blade. These
can be straight single cuts, slots for insertion of other items,
holes cut to any shape and size, and custom images provided by the
client.
Die, Duplicate
In embossing dies, molded duplicates made from the original dies.
These can be made of various materials. These are used to cut cost
when making multiple dies.
Die, Embossing
The female die hand sculpted, machine-tooled, or photo-etched. Used
to emboss or reshape the paper under heat and pressure.
Die, Foil-Embossing
Same as Combination Die
Die, Stamping
A photo-etched or machined die used to flat stamp foil to paper or
other substrate.
Die, Steel Rule
A cutting die used on letterpress to pierce or cut out paper.
Generally made type high (.918”) with 1/32” thick steel rule blades,
or rules, cut and bent to specific patterns and mounted in a wooden
base.
Domed
A shape put into embossed or debossed images resembling a
semi-circle or half-moon.
Emboss
Raising the image above the paper level.
Foil
General term for hot stamping material, consisting of a film carrier
coated with a release agent, a color coat or metalized aluminum, and
an adhesive coat.
Foil Embossing
Raising the image and applying foil at the same time with one press
run, as with a combination, foil embossing die.
Foils, Dusted
Foils that utilize a bronze powder on the carrier. Easily applied,
but easily rubbed off without an over-coating.
Foils, Flat Pigment
Opaque foils of intense color, resembling flat paint.
Foils, Gloss
Transparent foils glossy in appearance.
Foils, Gloss Pigment
Opaque foils of intense color, resembling glossy enamel paint.
Foils, Holographic
Foil that has holographic images embossed into it, allowing the
viewer to view the stamped holographic image three-dimensionally
without special eyewear.
Foils, Metallic
Metallized aluminum foils available in many colors, either shiny, or
satin in finish. The most widely used are gold and silver.
Foils, Patterned
Foils manufactured with specific patterns rather than one color.
These range from woodgrains, marble, or multi-colors to the new
three-dimensional holographic patterns or images.
Foils, Pearlescent
Similar to gloss foils, having a translucent pearl color.
Foils, Tint or Pastel
Flat or dull translucent stamping foil. Can be applied in varying
degrees of color density by changing the press temperature when
stamping.
Glazing
Smoothing a textured stock with controlled heat and pressure. Gives
a shiny effect.
Gripper Edge
The edge of the sheet which is pushed or pulled against a
predetermined stop on the press. For registering purposes, the same
designated edge is used during all processes.
Hologram
A three-dimensional picture that is made on a photo-sensitive glass
plate using a laser as the light source. From this plate a shim is
made and the image is stamped into a metallic foil.
Hot Stamping
Applying foil with the use of heat, pressure, and dwell to various
substrates, such as paper, plastic, wood, and leather.
Image Area
Any element of design to be printed stamped or embossed.
Light or Color Fastness
The ability of foil products to resist fading when exposed to light.
Multi-Level
Raising and/or lowering an image two or more levels.
Non-Image Area
Background area, as opposed to image area. The carrier, paper, or
substrate on which the image is printed or stamped.
Paper, Uncoated
Paper that is better for embossing because it’s soft finish has less
tendency to wrinkle or crack. Foils will appear less glossy on these
stocks. Uncoated textured sheets may sometimes be very difficult to
smooth out when foil stamped.
Paper Level
Reference point for all embossing or debossing.
Photo-Mechanical
Sometimes referred to as chemical milling. Image is exposed with a
light-sensitive emulsion on film positive or negative, then
acid-etched to a specific depth and angle. Depending upon the die
function, the image is etched into an embossing die and the
non-image area is etched into away on a stamping die.
Plasticizer Migration
When foil is stamped on PVC or other plastic products, the
plasticizer migrates from the foil area to the surface of the
plastic piece. The result is that the metallic foil will fade.
Press Proof
A short press run for approval by the client prior to the actual
production run. It uses the specified paper, inks, dies, etc. for
the press operator to match in actual run.
Reverses
Openings in the image where the background or paper show through the
printed or foil areas. Can either be type or design elements.
Scorching/Heat Tint
Changing the paper color in the embossed or debossed area by using
excessive heat, which creates a two-toned effect, with the image
being the darker tone.
Scoring
Sharply creasing a material to facilitate folding. It should be made
the same direction as grain of paper when is of folding is the
primary concern. For greater strength, a score can be made
perpendicular to the paper grain.
Sculpted Embossing
Raising and/or lowering an image with sculptural realism with a
variety of shapes, angles, and edges, as opposed to flat levels.
Examples: A sculpted image of a face, a bird’s feathers, or the
muscle definition of an athlete.
Single Level
Raising or lowering an image one flat level from paper level.
Step and Repeat
Same image precisely repeated one or more times horizontally and/or
vertically to predetermined distances. These distances from one
image to another are referred to as “center” when measured from a
point on one image to the same point on an adjacent image.